TP Link Extender Setup at tplinkrepeater.net: Step-by-Step Instructions
In this modernized world, boosting your wifi coverage to access your home and office is just getting easier with the new TPLink range extenders. However, these devices are capable enough to extend your network area, providing quick and stable internet connectivity, even in the dead zones. To elevate your home networking experience, you must learn the TP Link Extender Setup first.
Therefore, this ultimate manual will take you through easy and efficient procedures of How To Setup TP Link Wireless Range Extender. Additionally, this guide lays the path for a convenient, user-friendly guide to setting up your TP Link extender easily, with a thorough understanding, and without any hassle. Moreover, you will also learn about the common TP-Link Extender Setup errors, with the appropriate fixes. For more details, read this guide quickly.
Preparation Before TP Link Extender Setup
It is always good to get your environment and equipment ready before getting into the actual TP-Link WiFi Extender Setup. Begin by selecting a perfect site to place your extender, which is usually halfway between your primary router and dead zones.
Additionally, make sure that the extender gets a good signal, besides extending coverage to dead zones. Then, verify the name of the Wi-Fi network (SSID) and the password of your main router that you would require when setting it up. Also, get ready a device with an internet connection, e.g., smartphone, tablet, or computer, to be connected to the extender wirelessly.
On the other hand, you can also opt for an Ethernet cable in case required. Make sure that your device has a stable Wi-Fi enabled. Finally, to simplify the process a bit, you will need to have the tplinkrepeater.net and the default IP of the extender, which is 192.168.0.254. Next, you must be ready to explore How To Setup A TP Link Extender in different ways.

How To Setup TP Link Extender: Three Easy Methods
Moving further, the TP Link WiFi Extender Setup the ability to configure them to fit various use cases and technical levels, according to the comfort of users. There are mainly three ways to Setup TP Link Extender, i.e., web browser, via the app, and WPS button. You may select the WPS setup to connect quickly, without remembering the web/IP addresses.
Additionally, you can configure through the web browser on tplinkrepeater.net or 192.168.0.254 or the easy-to-use TP-Link Tether application on your smartphone. These methods will ensure you have an effective TP Link WiFi Extender Installation as per your own network requirements. If you are interested in learning How Do I Setup TP Link Extender via these methods, walk through the subsequent sections carefully.
TP Link WiFi Extender Setup via Web Browser
- To begin, plug your TP-Link range extender near your main router.
- Next, check the LED indicators on your device.
- Then, connect your PC to the default Wi-Fi network of the extender called TP-LINK_Extender.
- You can also use the Ethernet cable connections.
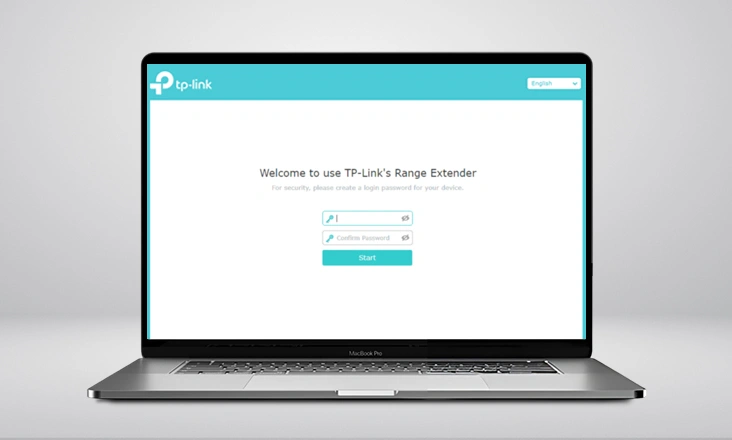
- Now, launch any web browser and navigate to tplinkrepeater.net.
- After logging in, you will access the web management page of the extender.
- Next, go to Wireless and choose the 2.4 GHz network of your main router and add it to the list of available Wi-Fi networks and password.
- If your device supports 5 GHz, you can configure it too.
- Customize your wifi SSID and password and save the changes.
- When your device reboots, you can enjoy an extended wifi network in your range extender.
- For further configuration, such as Parental Controls, Guest Networks, etc., follow the on-screen instructions.
- Ultimately, the TP Link Extender Setup is completed.
How To Setup TP Link Wifi Extender Via WPS Button?
- Initially, make sure your TP-Link range extender is placed near the main router.
- Now, power on your devices and check the LED indicators.
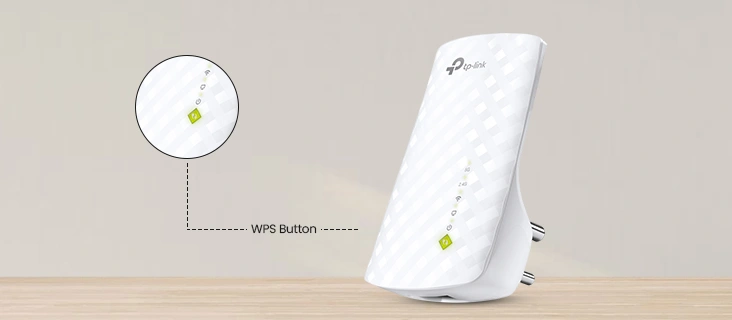
- Then, find the WPS button on the main router and extender.
- After that, push this button on the range extender and then on the router within 2 minutes.
- Meanwhile, the WPS LED on your router and extender blinks.
- Wait for a few seconds to establish the connection between your devices.
- Finally, the TP Link Extender WPS Setup is finished.
How To Setup A TP Link Wireless Range Extender Using Tether App?
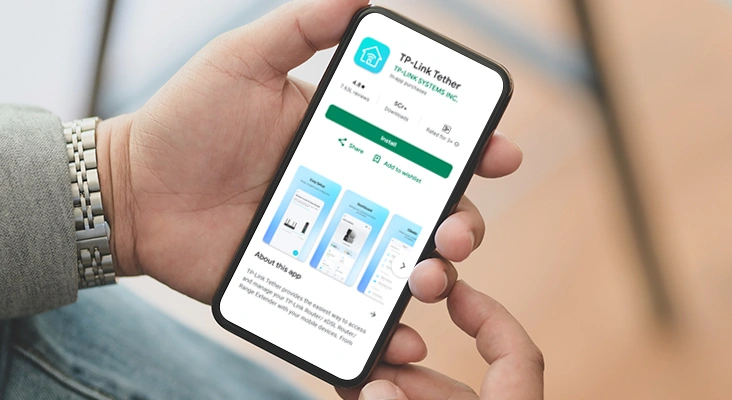
- First of all, download the Tether app on your smartphone.
- Then, link your smartphone to a stable 2.4 GHz wifi network.
- Now, download the TP-Link Tether app on your smartphone with the latest version.
- Next, launch the app and create a TP-Link ID first.
- If you already have these credentials, then log in using your valid ID and password.
- Next, tap “+” to add a new device, and then select “Range Extender” on the next page.
- Sometimes, the app will automatically detect your device and begin connectivity.
- Then, create a new password for your local account.
- Next, grant the necessary permissions on your device and connect your device to wifi.
- You can customize the 2.4 GHz and 5 GHz wifi settings as per your preferences.
- After that, set a different password for the extended network.
- Then, follow the app instructions to complete this setup process.
- Lastly, the TP Link Range Extender Setup via the app is completed.
Advanced TP Link Extender Setup Options
Moreover, for all the users who seek superior and uninterrupted network performance, with seamless coverage, there are several advanced options available. However, you can set up the TP-Link mesh wifi range extenders with OneMesh, which allows you to get rid of dead zones and provide consistent speeds. Here is how to perform the TP Link Mesh WiFi Extender Setup step-by-step:
- Firstly, plug your repeater near the wifi router into a working electrical outlet.
- Now, connect your Windows or Mac system to the TP-Link repeater network wirelessly.
- After that, log in to your repeater’s admin panel using valid administrative details.
- Then, select the host network (2.4 GHz) associated with OneMesh or EasyMesh.
- You can find this wifi network from the list of networks detected by your device.
- After that, enter your wifi password and join the network.
- Some repeater models automatically detect the host wifi password.
- When your repeater connects to the TP-Link OneMesh or EasyMesh router network, it will use the same wireless settings as the router.
- Then, follow the guidelines appearing on your screen to optimally place your device.
- Finally, the TP Link Mesh WiFi Extender Setup is completed.
Troubleshooting Common TP Link Wireless Range Extender Setup Issues
Having trouble with your TP-Link wireless extender? It may be most likely because of several frequent problems, including a weak signal of the router, a misplaced physical connection, or an invalid address to log in. There can be several other causes behind the TP Link Extender Setup failure, which may halt the normal functioning of your range extender. If you ever face any of the setup issues, try these quick tips:
- To start with, ensure the extender is inserted in an active power source and enable its Power LED to be solid.
- Secondly, position the extender at the best spot, halfway between your Wi-Fi dead zone and your main router.
- Next, check if you are connected to the default Wi-Fi network of the extender.
- When the tplinkrepeater.net not working, access the login page with the IP address 192.168.0.254.
- Moreover, if you are unable to log in, use the default username and password.
- Clear the browser cache if the tplinkrepeater net not loading or use another browser.
- If you forget your default login details, you can recover them by using the password recovery feature.
- Most importantly, reboot your main router and your modem to fix the temporary glitches and bugs.
- When you face slow connection issues, make sure you have a clear channel in your router to prevent Wi-Fi interference.
- Cross-verify the extender settings and make sure you perform the TP-Link Extender Setup in the extender mode only.
- Next, turn off any MAC filtering of your main router that may be preventing the connection of the extender.
- Certainly, you must regularly update your router firmware, because old versions may lead to problems related to connecting new devices.
- Lastly, in case the extender will not connect again, then attempt a factory reset and restart the setup anew.
In short, this guide suggests the best possible ways to get a seamless network growth and remove dead zones on Wi-Fi connections through the TP Link Extender Setup. If you want to know more, visit us today!
FAQs
Why can’t I access tplinkrepeater.net or 192.168.0.254 during setup?
If you are unable to access tplinkrepeater.net or 192.168.0.254 during the setup, make sure your device has a stable and strong internet connection. Then, ensure that the web and IP address are correct, or power cycle your device. If the issues persist, clear your web browser cache data or switch to another browser.
How do I know if my TP-Link WiFi Extender Setup is correct?
When you complete the TP Link Extender Setup, the solid LED indicators on your range extender represent the signs of a good connection and are configured correctly.
What should I do if my Wi-Fi speed is slow or unstable on the extended network?
When you are facing slow or unstable wifi speed issues on your extender’s network, ensure a regular firmware update on your device. You can also consider repositioning your wifi range extender near your devices and dead zones.